Freat - writing a game hacking birdfeeder for fun and...fun
This blogpost, together with its proof of concept tool, were only developed to learn more about how game cheats are made, and what techniques might be used to write them. Only single player games have been used as experiments, as it should be. I do not condone using any of the techniques shown in this post to develop/sell cheats for multiplayer games, either PvE or PvP. Learning is fun. Online cheating is lame.
Intro#
Howdy.
Some time ago, I was hanging around with a few friends on Discord, and we were trying to attach CheatEngine to an Android game. Googling or LLM-ing “Can I run CheatEngine on Android?” yields responses even more confusing than asking which fruit is OK on pizza, so that didn’t help.
In the end, IIRC, we sort of managed to use the tool, but I was left wondering: how hard could it be to follow the one and only parable and build our own cross-platform game hacking birdfeeder?
Turns out, it’s not trivial. Turns out, it’s actually fun.
What and How#
The requirements for this proof of concept are heavily inspired by CheatEngine. Nonetheless, it’s not plagiarism, it’s admiration.
The “Hello World” of game hacking is a Memory Hack — heck, it’s actually the only hack included in the Game Hacking Academy’s basics chapter.
A memory hack essentially boils down to finding the memory address where a given game entity – such as your health, gold, ammo, or RAL, on life simulators – is stored in the game memory, and changing it.
So the tool needs to read and write process memory, do it cross-platform (this whole thing started because CheatEngine wouldn’t run on Android), and expose an interactive UI; after all, memory hacking is an iterative, trial-and-error process.
I know what you’re thinking. In 2026, I should consider making this agentic or, at the very least, expose an MCP server with simple scanning tools. However, for this PoC, I really only wanted to experiment with memory scanning internals. I’ll leave the “asking Claude to write my cheats” quest for another session.
Now, I have a confession. Remember when I said my initial thought was “how hard could it be to build our own cross-platform game hacking birdfeeder”? Well, it was more something like: “how hard could it be to build one WITH FRIDA?”
The truth is, this past year I’ve used the awesome frida framework quite a lot, and well, when you have a hammer, everything looks like a process to inject frida with. Point is, frida makes a lot of sense for this quest. It is cross-platform, cross-architecture, and it comes with batteries. Lots of them.
For the GUI, a smart choice would be to use one of those modern web-based frameworks, maybe the ones that support native WebViews.
But honestly, when did I let you believe we were in the market for smart choices?
I’ve gone with Godot — the open source game engine. Games need UIs, and Godot is flexible enough to let you leave out the game and just pick the UI part. Truth be told, the UI library is probably not the best thing that Godot has to offer, but since I really like the engine and I get to visually develop the UI using the editor, it works for me.
Since the frida agent runs inside the target game and the Godot GUI runs as its own process, they need a bridge. A Python service handles this: the frida-python bindings are officially supported, and it exposes a JSON-RPC-like endpoint over WebSocket. GDScript has decent WebSocket support, so it all fits together.
![[diagram.png]]
Now, most of the code written for this project is really straightforward. I already knew that frida can attach to processes and read/write memory, and I knew Godot can build decent UIs. So why call this a “proof of concept”?
Because I was totally unsure about the feasibility of fast memory scanning with frida.
For each scan, the tool needs to:
- Enumerate every memory segment currently mapped in the process
- Take the target size (e.g. 4 bytes)
- Take the target type (e.g. unsigned integers)
- For each possible 4-byte value in memory, compare that value with the target value
Clearly, doing that in a way that allows live interaction requires some experiments. We love experiments!
Deep Dive: scanning memory like no big deal#
In order to evaluate and compare performances of the candidate implementations for memory scanning, one needs to build a lab.
Writing a simple C program would not be a good idea to test feasibility, as we need to see what happens when we scan a full-fledged game with a ton of memory segments loaded. Thus, we need a real game.
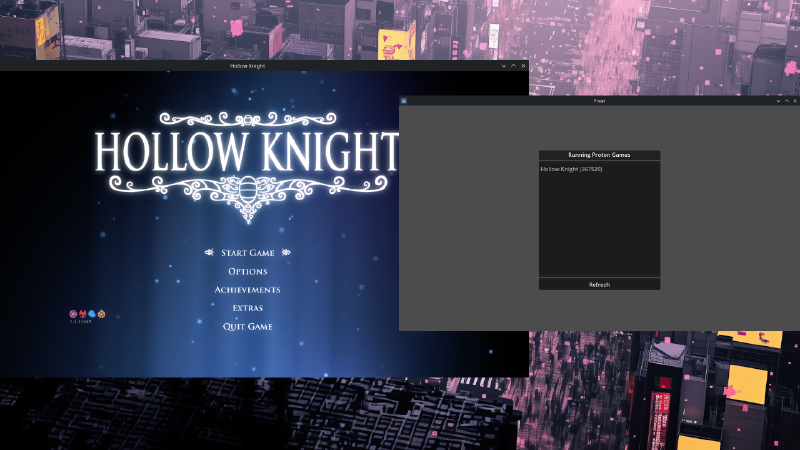
Yes, a real game like this one:

In this experiment, we run the game on Linux (there’s a native build for Hollow Knight). After all, we did say this was going to be a cross-platform proof of concept.
The goal of this cheat is simply to get ourselves a lotta Geo.
The approach to get there is the following:
- Scan the whole memory to find addresses that contain the current Geo value. In this case, it’s 128.
- Do something in the game to change how much Geo we have, either by spending or collecting them.
- Re-scan all the addresses collected at step 1, looking for addresses that now contain the new Geo value.
- Repeat steps 2-3 enough times to filter to a reasonably small number of results (ideally one).
- Once we have a good candidate, we can check if we got it right by writing a new value into that variable, and checking if it reflects in the game.
Without further ado, let’s proceed with the experiments!
The batteries: MemoryScan API#
I said before that frida comes with batteries, and that’s correct. In fact, memory scanning is a feature already supported by frida.
The API has the following signature:
Memory.scan(address, size, pattern, callbacks)Where address and size are used to establish the range, pattern is a string in the form “BB BB BB BB”, where BB are byte values representing the values we’re scanning for, and callbacks is an object containing functions for the promise resolution (onMatch, onError, onComplete).
The implementation of our reference algorithm with the MemoryScan API follows below:
import { log } from "./logger.js";

let addresses: NativePointer[] = [];

function numToPattern(num: number): string {
  return [
    num & 0xff,
    (num >>> 8) & 0xff,
    (num >>> 16) & 0xff,
    (num >>> 24) & 0xff,
  ]
    .map((byte) => byte.toString(16).padStart(2, "0"))
    .join("");
}

export function firstScan(value: number) {
  const bytePattern = numToPattern(value);
  addresses = [];

  const ranges = Process.enumerateRanges("rw-");

  const start = Date.now();
  ranges.forEach((range, i, arr) => {
    const { base, size } = range;

    Memory.scan(base, size, bytePattern, {
      onMatch(address, size) {
        addresses.push(address);
      },
      onComplete() {
        const elapsed = Date.now() - start;
        if (i === arr.length - 1) {
          log(`firstScan: ${addresses.length} candidates in ${elapsed}ms`);
        }
      },
      onError(error) {},
    });
  });
}

export function nextScan(value: number) {
  const newAddresses: NativePointer[] = [];

  const start = Date.now();
  addresses.forEach((address) => {
    if (address.readU32() === value) {
      newAddresses.push(address);
    }
  });
  const elapsed = Date.now() - start;
  log(
    `nextScan: ${newAddresses.length} candidates in ${elapsed}ms (was ${addresses.length})`,
  );
  addresses = newAddresses;
}

rpc.exports = {
  firstScan,
  nextScan,
  getAddresses: () => addresses,
};
The code should be straightforward, but here’s a couple of notable mentions:
- The
numToPatternfunction is just a very ugly way of encoding numbers into 32-bit Little Endian bytes - We’re calling
Memory.scanmultiple times, one for each memory range that is marked both readable and writable, to avoid having to feed the entire memory range into the API - The
Memory.scanAPI is asynchronous, which means that calling thefirstScanexport does not block the REPL
Here follows an excerpt of the frida interaction while using this cheat:
[Local::hollow_knight.x86_64 ]-> rpc.exports.firstScan(128)
[Local::hollow_knight.x86_64 ]->
firstScan: 207971 candidates in 1518ms
[Local::hollow_knight.x86_64 ]-> // here I played HK, earning Geo
[Local::hollow_knight.x86_64 ]-> rpc.exports.nextScan(130)
nextScan: 8 candidates in 234ms (was 207989)
[Local::hollow_knight.x86_64 ]-> // earned some more Geo
[Local::hollow_knight.x86_64 ]-> rpc.exports.nextScan(132)
nextScan: 2 candidates in 0ms (was 8)
[Local::hollow_knight.x86_64 ]-> var addresses = rpc.exports.getAddresses()
[Local::hollow_knight.x86_64 ]-> addresses[0].writeU32(31337)
"0x7f4116c041cc"
And, voilà:

In terms of elapsed time, we mostly consider the first scan, which is generally the heaviest one, since we need to scan through all the memory space. The Memory.scan API took 1.5s for that, which I would consider quite acceptable in terms of UX.
This first experiment went well…but we can’t really wrap it up here.
What about non-exact scans?
In reality, exact scans are not enough to identify game properties, simply because in many instances there would be no way to identify an exact value.
An example of this in HK would be the speed of the Ghost, or its health value. In such cases, we are only able to determine whether a certain value is increasing or decreasing (i.e. relative scanning) rather than its exact value, and this requires a flexibility that the Memory.scan API does not provide.
Initially, I thought about enriching the API by patching frida, but I soon realized this would have probably introduced breaking changes, therefore I decided to go a different route: that is, reimplementing the Memory scanning logic in the agent.
While, as mentioned, the reason for re-implementing memory scanning is to support different kinds of scans (e.g. relative scans), for the following experiments I will still be using the simple Geo memory hack as reference, in order to keep using frida in its standalone REPL mode rather than having to complicate things. In the Showcase section, however, I will present an example of advanced scanning used to gain uber-fast speed.
Memory Scanning in JS#
My first - very naive - solution was to implement something like:
  const ranges = Process.enumerateRanges("rw-");

  const start = Date.now();
  ranges.forEach((range, i, arr) => {
    const { base, size } = range;
    console.log(
      `Scanning range ${i + 1}/${arr.length}: ${base} - ${base.add(size)}`,
    );
    try {
      for (
        let address = base;
        address < base.add(size);
        address = address.add(4)
      ) {
        const word = address.readU32();
        if (word === value) {
          addresses.push(address);
        }
      }
    } catch (error) {
      // pass, we don't want to spam the console
    }
  })
on every iteration, we scan a 4-byte value, and we compare it with our target value.
This approach soon demonstrates to be unfeasible: every range-scan is unbearably slow and after a few of them, the process crashes.
I can try to improve on that: assuming that the bottleneck is caused by calling the address.readU32 API a huge number of times, a solution would be to read a whole range and then search the needle locally, in JS:
 const ranges = Process.enumerateRanges("rw-");

  const start = Date.now();

  ranges.forEach((range, i, arr) => {
    const { base, size } = range;

    console.log(
      `Scanning range ${i + 1}/${arr.length}: ${base} - ${base.add(size)}`,
    );

    try {
      const buffer = base.readByteArray(size);
      if (!buffer) return;

      const view = new Uint32Array(buffer);

      for (let i = 0; i < view.length; i++) {
        if (view[i] === value) {
          addresses.push(base.add(i * 4));
        }
      }
    } catch {
    }
  });
I loaded the agent in the HK process and tried again. The result:
[Local::hollow_knight.x86_64 ]-> rpc.exports.firstScan(128)
Scanning range 1/322: 0x203000 - 0x204000
Scanning range 2/322: 0x259c6000 - 0x29b46000
Scanning range 3/322: 0x40ebd000 - 0x40ecd000
Scanning range 4/322: 0x410fe000 - 0x411ad000
// SNIP
firstScan: 17070 candidates in 12328ms
[Local::hollow_knight.x86_64 ]-> // earned some Geo
[Local::hollow_knight.x86_64 ]-> rpc.exports.nextScan(129)
nextScan: 3 candidates in 20ms (was 17070)
[Local::hollow_knight.x86_64 ]-> // earned some Geo
[Local::hollow_knight.x86_64 ]-> rpc.exports.nextScan(130)
nextScan: 2 candidates in 0ms (was 3)
[Local::hollow_knight.x86_64 ]-> var addresses = rpc.exports.getAddresses()
[Local::hollow_knight.x86_64 ]-> addresses[0].writeU32(31337)
"0x7fedbdeea1cc"
[Local::hollow_knight.x86_64 ]->
It worked, but 12 seconds is not great for the interactive tool I wanted to PoC.
CModules to the rescue#
At this point, I considered going full native with frida. After all, the JS bindings are just a convenient way to script agents, but nothing would prevent you from using the C API to develop the agent, which would address the performance issues.
However, in doing so you would lose some of the nice-to-haves, such as, notably, all that machinery about having RPC exports and calling frida functions from Python. Instead, you’d need to re-implement a way of talking back to the Python side.
Remember I told you about frida batteries? Well there’s one that is particularly useful in this scenario: it’s the CModule.
Essentially, the CModule is an API that frida offers for scenarios where you need to perform “hot” operations that require native performances, without having to drop altogether the JS API.
The CModule accepts C source code as one of its arguments, and in its default configuration, it compiles it inside the process using a statically linked Tiny C Compiler.
I can move all the memory read logic of the scanner in a CModule and then only report back results to the JS land:
const cScannerCode: string = `
  #include <glib.h>
  #include <stdint.h>

  uintptr_t * scan_region(uintptr_t base_address, size_t region_size, void *value_ptr, gsize *out_count) {
    GArray *results = g_array_new(FALSE, FALSE, sizeof(uintptr_t));
    uint32_t value = *(uint32_t *)value_ptr;
    uintptr_t end_address = base_address + region_size;

    for (uintptr_t p = base_address; p <= end_address - 4; p += 4) {
      uint32_t *ptr = (uint32_t *)p;
      if (*ptr == value) {
        g_array_append_val(results, p);
      }
    }

    *out_count = results->len;
    return (uintptr_t *)g_array_free(results, FALSE);
  }

  uintptr_t * filter_scans(uintptr_t *scan_results, size_t count, uintptr_t *filter_value_ptr, gsize *out_count) {
    GArray *filtered_results = g_array_new(FALSE, FALSE, sizeof(uintptr_t));
    uint32_t filter_value = *(uint32_t *)filter_value_ptr;

    for (gsize i = 0; i < count; i++) {
      uintptr_t address = scan_results[i];
      uint32_t *ptr = (uint32_t *)address;
      if (*ptr == filter_value) {
        g_array_append_val(filtered_results, address);
      }
    }

    *out_count = filtered_results->len;
    return (uintptr_t *)g_array_free(filtered_results, FALSE);
  }
`;

const cm = new CModule(cScannerCode);
const scan_region = new NativeFunction(cm.scan_region, "pointer", [
  "pointer",
  "size_t",
  "pointer",
  "pointer",
]);
const filter_scans = new NativeFunction(cm.filter_scans, "pointer", [
  "pointer",
  "size_t",
  "pointer",
  "pointer",
]);

let currentScanResults: { ptr: NativePointer; count: number }[] = [];
const outCountPtr = Memory.alloc(Process.pointerSize);
const valuePtr = Memory.alloc(Process.pointerSize);

export function firstScan(value: number) {
  const start = Date.now();
  const ranges = Process.enumerateRanges("rw-");
  currentScanResults = [];

  ranges.forEach((range) => {
    try {
      valuePtr.writeU32(value);
      const newResultsPtr = scan_region(
        range.base,
        range.size,
        valuePtr,
        outCountPtr,
      );
      const count = outCountPtr.readU32();
      if (count > 0 && !newResultsPtr.isNull())
        currentScanResults.push({ ptr: newResultsPtr, count });
    } catch (error) {}
  });
  const totalCount = currentScanResults.reduce(
    (acc, { count }) => acc + count,
    0,
  );
  console.log(
    `First scan took ${Date.now() - start}ms, total addresses found: ${totalCount}`,
  );
}

export function nextScan(value: number) {
  const start = Date.now();
  const newResults: { ptr: NativePointer; count: number }[] = [];
  valuePtr.writeU32(value);
  currentScanResults.forEach(({ ptr, count }) => {
    try {
      const filteredPtr = filter_scans(ptr, count, valuePtr, outCountPtr);
      const filteredCount = outCountPtr.readU32();
      if (filteredCount > 0 && !filteredPtr.isNull())
        newResults.push({ ptr: filteredPtr, count: filteredCount });
    } catch (error) {}
  });
  currentScanResults = newResults;
  const totalCount = currentScanResults.reduce(
    (acc, { count }) => acc + count,
    0,
  );
  console.log(
    `Next scan took ${Date.now() - start}ms, total addresses found: ${totalCount}`,
  );
}

export function getAddresses(): NativePointer[] {
  const addresses: NativePointer[] = [];
  currentScanResults.forEach(({ ptr, count }) => {
    for (let i = 0; i < count; i++) {
      addresses.push(ptr.add(i * Process.pointerSize).readPointer());
    }
  });
  return addresses;
}

rpc.exports = {
  firstScan,
  nextScan,
  getAddresses,
};
Notable highlights of the code above:
- The
CModuleis built from C source code. The C code defines two functions,scan_regionandfilter_scans, then exported asNativeFunctions in the JS agent. - To pass results back and forth between C and JS, it works like this:
- The JS agent defines
currentResults, a list of objects, each one defined by aNativePointerand acount. - For each range, the
scan_regioncreates aGArrayof results, populating it with addresses that match the scan. - The
scan_regionreturns the address of the array and its length, stored in a separate result pointer. The address and the length are used to append a new item incurrentResults. - The flow for
filter_scansis analogous.
- The JS agent defines
This implementation of memory scanning with CModules is just one way of doing things, simplified for the sake of the PoC. There are improvements that can be applied all over the code, such as using SIMD instructions to compare multiple words at once, or using simple arrays rather than glib arrays to avoid losing time on bound checking.
Time to test this new agent:
[Local::hollow_knight.x86_64 ]-> rpc.exports.firstScan(128)
First scan took 1705ms, total addresses found: 17196
[Local::hollow_knight.x86_64 ]-> // earned some Geo
[Local::hollow_knight.x86_64 ]-> rpc.exports.nextScan(131)
Next scan took 1ms, total addresses found: 3
[Local::hollow_knight.x86_64 ]-> var cur = rpc.exports.getAddresses()
[Local::hollow_knight.x86_64 ]-> cur[0].writeU32(31339)
"0x24f64c94"
[Local::hollow_knight.x86_64 ]-> cur[1].writeU32(31339)
"0x7f6d727511cc"
[Local::hollow_knight.x86_64 ]-> cur[2].writeU32(31339)
"0x7f6d76184880"
[Local::hollow_knight.x86_64 ]->
The scan worked, and the first scan took less than two seconds, which is perfectly in line with the performance of the Memory.scan API.
Moreover, with the added flexibility of writing my own code in C, I can easily support custom scan types simply modifying the scan_region and filter_scans code, just like this:
// ...
switch (scan_type) {
	case EXACT:
		if (value_at_addr == value_to_scan) {
			match = TRUE;
		}
		break;
	case LESS_THAN:
		if (value_at_addr < value_to_scan) {
			match = TRUE;
		}
		break;
	case GREATER_THAN:
		if (value_at_addr > value_to_scan) {
			match = TRUE;
		}
// ...
Freat - Feature showcase#
Alright, after our little digression on how to use frida CModules to gain the best of the proverbial worlds, in this section I am going to showcase what I’ve built, taking you all on a journey of genuine and exploratory game hacking.
The tool is called freat, an extremely brilliant and secret portmanteau of the words frida and cheat, with a little linguistic easter egg for our European friends.
Wine support (and Steam Proton, too)#
Freat is cross-platform in the sense that the release package can be built for Linux/macOS/Windows, but also - and most importantly - in the sense that, independently of where the server runs, it can attach to games running on any machine where frida is supported.
Among the target providers (read about providers in the documentation) that are implemented, I added Wine and Proton.
You probably heard about Wine, the compatibility layer that powers pretty much every tool out there that Linux/macOS gamers use to play Windows games without dual booting. I thought it was cool to implement support for it, so that one could run Freat on a Linux host, run a Windows game through Wine, and still be able to attach to it.
Turns out a simple way to implement this is simply to download the frida-server release for Windows, run it under the correct Wine prefix (which basically is the “machine” where Wine installs programs and Windows libraries, and more than one can exist on the host), and then connect to the exposed server, and frida will be able to see the Windows processes running in the “virtual machine” (it’s not a virtual machine), and instrument, attach, etc.
With a working support for Wine, the next logical step was tackling the Proton layer. Proton is the black magic empowering the Steam Deck (and Linux gamers out there), and guess what, it’s actually a glorified fork of Wine. Which means, that supporting Proton is just a matter of scavenging a few directories to find out what is the correct Wine prefix for running Steam games!
Flexible Scanning#
Currently, the following scan types have been implemented in Freat:
Exact Scans#
Exact scans allow to scan (first scan) and filter (next scan) memory for a given value. We’ve already seen this in the previous section about CModules. Here’s how to do it in Freat:
Unknown Scans#
Sometimes, the game does not leak precise numbers for certain entities, and it rather uses visual representations such as spheres or bars.
In those cases, the “first scan” should be an unknown scans, where essentially every possible variable is taken into consideration. The - initially huge - list is then usually narrowed down by means of relative scans.
Relative Scans#
Relative scans allow to filter (next scan) current “selected” addresses, only picking those with a value that either increased, decreased or remained unchanged.
It can be quite useful to find game properties that do not expose exact values upon change, so it works well in tandem with unknown scans.
Memory Freezing/Scaling#
For some cheats, it is enough to overwrite a value in a single shot. This would work well, for instance, with the amount of gold our character possesses.
For some other variables, however, a one-shot write is not convenient. Rewriting our health, or our current speed, to a certain value, does not prevent the game from rewriting it soon after because enemies hit us or because the game loop has recomputed the speed.
Freezing to the rescue. Freezing boils down to, in a very hot loop (implemented as a native thread running in, guess what, a CModule), constantly rewriting the target variable with a value of our choice.
A similar, but practically different mode of freezing is scaling. When scaling a variable, instead of fixing it to a target value, the module takes the last value that was written by the game and multiplies it by a given factor.
This can be used, notably, for position-related variables such as horizontal velocity in 2D games. In those games, in fact, the velocity will be either zero, negative, or positive, depending on whether we’re moving left or right.
By scaling the existing value by a given factor, instead of choosing a target value, it is possible to just amplify or reduce a game property, while preserving functionality.
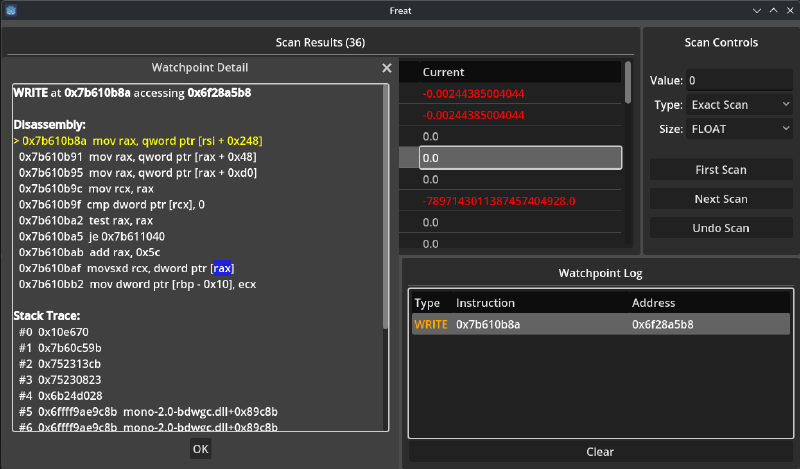
Watchpoints#
Scanning, freezing and writing memory can only get us so far. Most likely, starting from memory is just the first step toward identifying a function responsible for updating a property, start reverse engineering the game executable, and then writing a proper patch/mod.
For this reason, Freat supports setting watchpoints in read and/or write on identified addresses. Upon access, a popup appears with a simple stack-trace and some information on the modules and the offsets, to help bootstrapping the reverse engineering process.
Future work (?)#
Even though this started as a lame weekend experiment, I’m having fun exploring this space, so I might find other lame weekends to dedicate to it.
Some improvements that come to my mind:
- Improving scan/freezing performances
- Implementing support for live patches/code injections
- Implementing pointer scans to derandomize addresses and re-compute on new instances
Conclusion#
The goal of this proof of concept was, as it often happens with these journeys, to learn. For me - and I’m sure I’m not alone in this - building tools is the best way to do so.
After all, that’s why we take notes: we write things down so that our brain is able to spell them out and, in doing so, things get ordered and knowledge gaps immediately appear visible.
In the very same way, writing tools is a great way of “testing” our knowledge - or the one that we believe we have - and it’s guaranteed that very soon in the process we’ll start to find gaps, and new rabbit holes, and it all becomes a great playground for innovation.
The code is hosted on GitHub.
This journey is not over, by the way: while developing Freat, I faced new problems and found new solutions, and then…I gave in to scope creep and started working on more advanced features (some of them are still not public yet). I’ll write more!
Until next time. Happy hacking!